Set up a membership
- Availability
- Beta
- Last verified
- Last verified Nov 3, 2026
This tutorial sets up an annual membership. Members pay once, receive 10% off admission in the online shop and at the POS for one year, and lose the discount when their year ends. Adapt the names, price, discount, and validity to your own membership.
If you are not sure that this is the right kind of membership, read Get started with memberships first.
Before you start
- You can make changes in KORONA.studio, or a colleague who manages KORONA.studio can follow the KORONA.studio steps.
- You can configure memberships in the KORONA Event back office.
- The KORONA.studio synchronization works. See Understand KORONA.studio synchronization.
- You have decided the membership's price, its validity, and the prices or discounts members receive.
Step 1: Create the customer group in KORONA.studio
- In KORONA.studio, create a customer group for your members, for example Members.
- If you offer several membership levels, create one customer group for each level.
KORONA Event imports customer groups from KORONA.studio. You cannot create or rename them in KORONA Event.
Step 2: Set up member prices in KORONA.studio
Set up the prices or discounts that apply to the customer group. For a percentage discount, create an automatic promotion without a discount code:
- In KORONA.studio, create a promotion of the type Immediate discount.
- Select the products the discount applies to, for example all admission products, and set the discount to 10%.
- Add a Customer group condition and select Members.
- Assign the promotion to the points of sale that should apply it, including the point of sale assigned to your KORONA Event online shop.
You can also use other customer-group pricing that your KORONA.studio account provides. KORONA calculates the member price in the online shop and at the POS from the customer group of the order's customer.
Step 3: Create the membership product in KORONA.studio
- In KORONA.studio, create the product customers buy, for example Annual membership, with its price.
- Give the product a ticket definition with a validity of one year after activation. The ticket's validity decides how long the membership lasts.
- Assign a production type that activates tickets.
- Wait for the next synchronization. In the KORONA Event back office, Admin > Integrations shows Last successful synchronization.
Step 4: Add the membership type
The Memberships workspace is available to selected tenants during the beta. You need permission to configure memberships. If your tenant still uses the product editor, your existing settings remain there until the workspace is enabled.
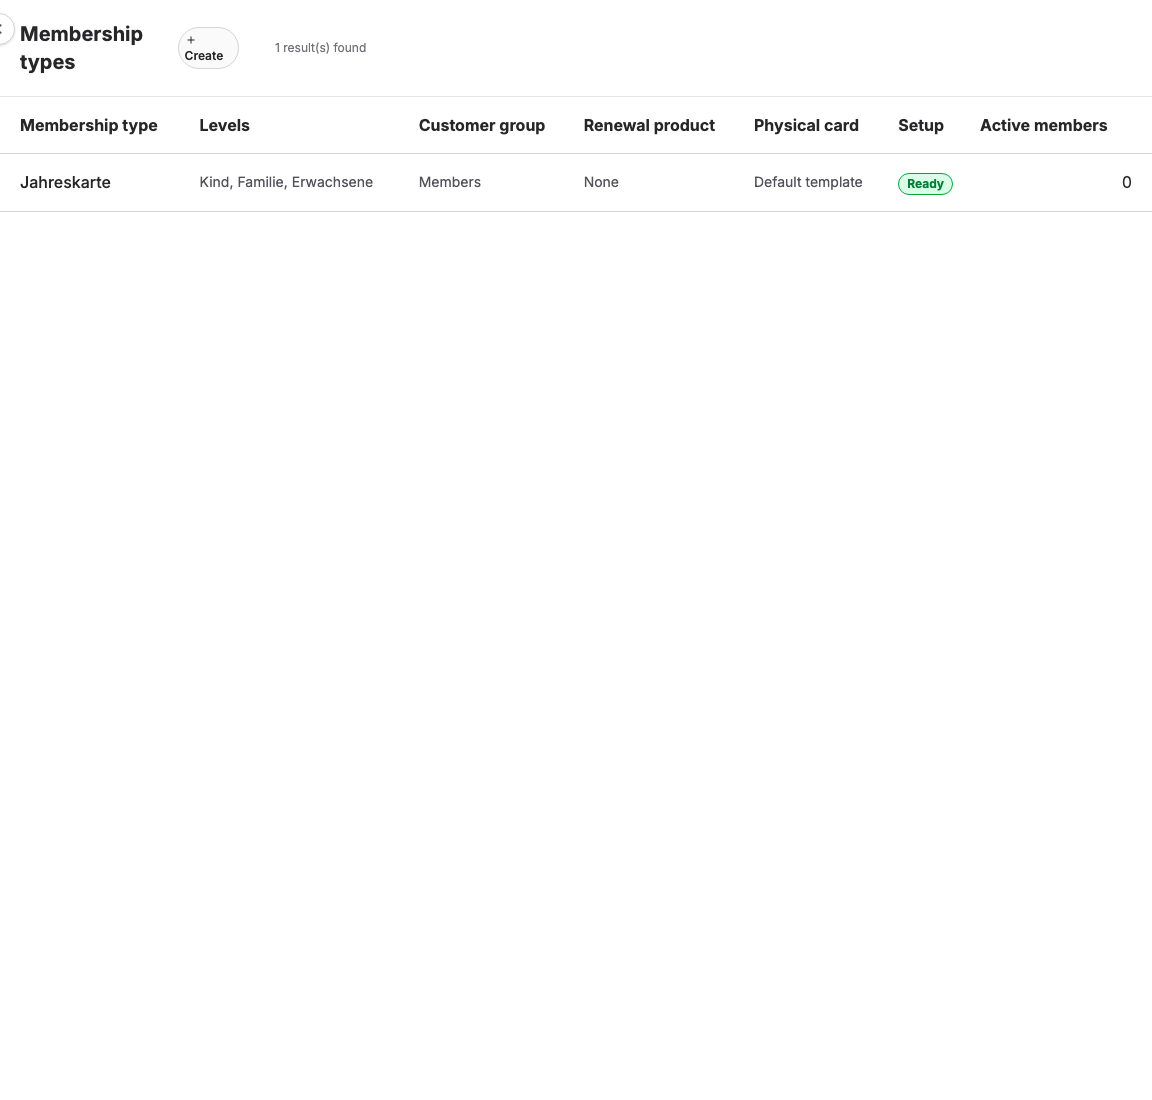
- Open Memberships > Membership types and add a membership type.
- Enter a name, for example Annual membership.
- Choose the admission or event template that sells it. The products behind its price categories become the membership's levels, for example Adult, Child and Family. For KORONA POS or direct sales, choose the products directly instead.
- Review the products. If a product is unavailable, follow its fix link: it must represent an attendee, use a production type that activates tickets and have a ticket definition with an end of validity. A product already assigned to another membership type cannot be added again.
- Create the membership type and open its detail page.
Step 5: Configure the levels
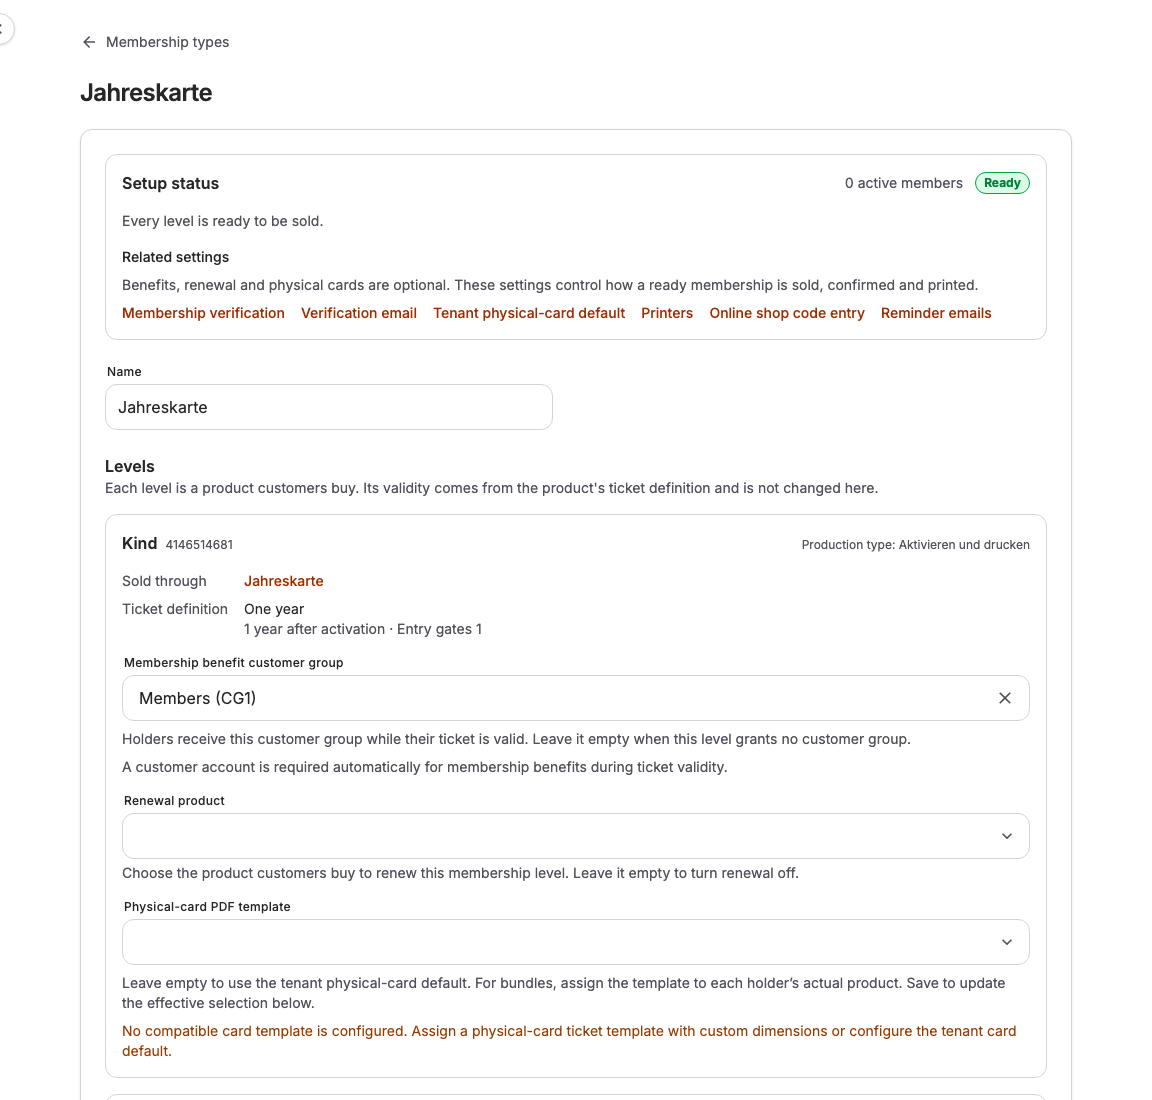
The detail page brings the membership settings together:
- Levels shows the products and where they are sold. Sales links come from the admission or event template's price categories.
- Membership benefit customer group lets you choose the customer group for each level while its ticket is valid. For this example, choose Members. Buying a membership with this benefit requires a customer account automatically.
- Renewal product lets you choose a renewal product for each level. Its ticket definition supplies the additional validity, uses and gates. Differences are shown so you can decide whether the renewal should have different access. See Configure membership renewal.
- The physical-card template selector lets you choose each level's physical-card template and shows the effective template source. Leave it empty to use the applicable default. See Configure physical membership cards.
- Under Settings for all levels, Membership verification in the online shop controls how holders prove their membership when using benefits without signing in. Choose ticket-number verification only for a bearer membership; choose email verification when the holder must prove access to the saved email address. It becomes available once every level has a customer-group benefit or a renewal product.
Save the membership type. Use the setup checklist to reach card defaults, printers, shop code entry and membership email templates.
Resolve readiness checks
Issues a membership number means the product creates an attendance and its production type activates tickets. This is required even if you do not use an entry system.
Validity comes from a ticket definition means a definition with an end of validity is assigned to the product. Without one, a ticket may use the admission visit date instead of your intended membership period. Set the duration in KORONA.studio, then synchronize it before adding the product.
The membership setup does not publish the admission or change its prices and sales channels. Make the admission or event template available where you want to sell it. For a direct product sale, see Sell products online.
Permanent Customer group after purchase and the explicit account requirement remain in a non-membership product's Online display. Use permanent classification when the customer should keep the group after the purchase rather than receive a ticket-validity benefit.
Step 6: Test the membership
- Open the online shop and sign in with a test customer account, or create one during checkout.
- Buy the membership product.
- In the back office, open Sales > Customers, select the test customer, and find Membership benefits on the Overview tab. The membership first shows Awaiting ticket source, then Active with the product and its validity.
- In the online shop, sign in as the test customer and start a new order with an admission ticket. At checkout, the ticket is charged the member price.
- Cancel the test orders. The membership changes to Revoked, and the test customer returns to their previous customer group.
A ticket in the same order as the membership is charged the regular price, because the membership starts after the order is booked. Test the member price with a separate order.
Allow membership use without an account
Open the membership type and choose its verification policy under Membership verification in the online shop:
| Setting | When to use it |
|---|---|
| Disabled | Membership numbers do not activate online benefits. |
| Ticket number is sufficient | Anyone with the number can use the benefits of a transferable bearer membership. |
| Email one-time code | The holder must have access to the email address associated with the ticket. Keep it current. |
Save the membership type. The online shop applies the membership's benefit to this order without changing the checkout contact's permanent customer group. Different membership groups cannot be combined on one order; remove the conflicting membership before continuing.
Customize the verification email
In Comms → Email Templates, open Membership verification to edit the subject, body, and translations. Keep the Membership verification code placeholder in every language so the holder receives the code needed to continue. The preview displays a sample code. Live verification emails are not retained in communication history.
See Edit an email template safely for the editor controls.
Choose where customers enter codes
In the shop page editor, add the Membership/pass block to the pages or detail templates where customers should enter their pass. Place it before ticket or price selection when membership changes the price. Save the page or template. The block is optional and is not added to pages automatically.
Customers see a compact Have a membership/pass? control. Opening it reveals the same field used for memberships, vouchers, and promotion codes.
Under the shop's Checkout settings, use Show code entry in cart and checkout to show or hide that entry point. It is enabled by default to preserve voucher and promotion redemption. This setting is independent of page-editor blocks. Already applied codes and memberships remain visible and removable even when new code entry is hidden.
After add-on deactivation, the Membership/pass page block is hidden. While valid, redeemable membership tickets remain, code entry stays available in the cart and checkout even when Show code entry in cart and checkout is switched off. This keeps previously sold memberships usable without changing your saved setting.
Membership verification settings determine which membership tickets are accepted; they do not add an entry block to shop pages.